Multi-User Mode: Federated AD4M
Overview
By default, every AD4M user runs their own local node. But not everyone wants to—or can—run their own infrastructure. Multi-user mode lets a single AD4M executor serve multiple users, each with their own identity (DID) and fully isolated data. This enables federated network structures where a host operates an AD4M node on behalf of others, much like an email provider hosts mailboxes for its users.
From the perspective of AD4M apps, nothing changes. Apps use ad4m-connect to establish a connection, and ad4m-connect handles whether the executor is local or remote. This means existing AD4M apps work without any modification in a multi-user setup.
Why Multi-User?
- Lower barrier to entry: Users who don't want to install or maintain software can simply connect to a hosted AD4M node.
- Federated topology: Organizations, communities, or service providers can host AD4M nodes for their members—similar to how Matrix homeservers or email providers work.
- Same agent autonomy: Each user still has their own DID, their own perspectives, and their own cryptographic identity. The host provides infrastructure, not control over data semantics.
Setting Up a Multi-User Host
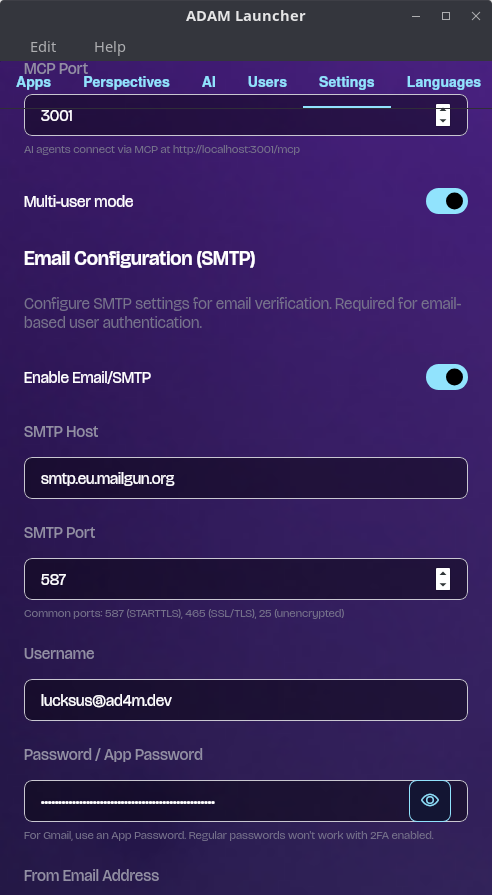
All of the configuration described below can be done graphically in the AD4M Launcher under Settings.
1. Enable Multi-User Mode
Toggle multi-user mode in the Launcher settings,
or programmatically:
// Enable multi-user mode
await ad4m.runtime.setMultiUserEnabled(true);

// Check if multi-user is active
const enabled = await ad4m.runtime.multiUserEnabled();
2. Make the Node Publicly Reachable
For remote users to connect, the AD4M executor must be reachable over the network:
- The host machine needs a public IP or domain name.
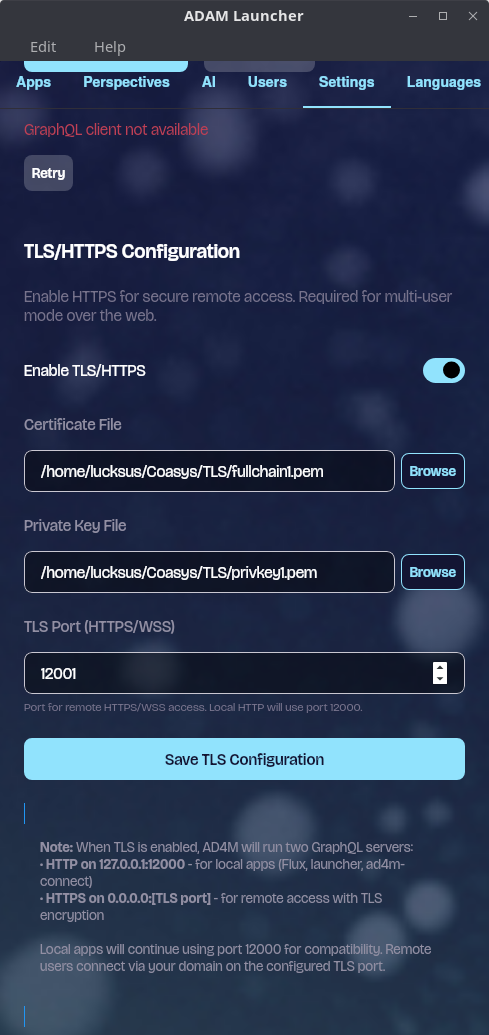
- The executor's default port is 12000. TLS must run on a separate port, which can be configured in the Launcher settings.
- If the host is behind a NAT or router, the relevant ports must be forwarded to the machine running the executor.
- A TLS certificate must be configured to encrypt the connection between clients and the executor. Without TLS, credentials and data would travel in plaintext. The TLS port and certificate can be configured in the Launcher settings.
Practical Host Setup Guide
The sections above describe the Launcher's configuration UI. This section walks through the actual infrastructure steps needed to make a multi-user host reachable and secure from scratch.
DNS Setup
Your host needs a domain name so that clients can connect to it by name rather than raw IP.
- Point an A record at your server's public IP address. For example, if your domain is
ad4m.example.comand your public IP is203.0.113.42, create:ad4m.example.com. A 203.0.113.42 - Dynamic DNS — If you're hosting on a home network without a static IP, use a dynamic DNS provider (e.g. DuckDNS, No-IP, Cloudflare with a DDNS updater) to keep the record in sync with your changing IP.
- Propagation usually takes a few minutes but can take up to an hour. Verify with:
dig +short ad4m.example.com
Obtaining a TLS Certificate
Let's Encrypt (opens in a new tab) provides free TLS certificates. The standard tool is certbot.
Install certbot (Ubuntu/Debian):
sudo apt install certbotDNS-01 challenge (recommended for home networks where port 80 may not be open):
sudo certbot certonly --manual --preferred-challenges dns -d ad4m.example.comFollow the prompts to create a DNS TXT record for verification.
HTTP-01 challenge (if port 80 is open on the server):
sudo certbot certonly --standalone -d ad4m.example.comAfter success, your certificate files will be at:
/etc/letsencrypt/live/ad4m.example.com/fullchain.pem
/etc/letsencrypt/live/ad4m.example.com/privkey.pem
File permissions gotcha: The
/etc/letsencrypt/directory is owned by root. The AD4M Launcher's file picker cannot browse into it, and the executor process (running as your user) may not have permission to read the files.Workaround: Copy the certificate files to a user-owned directory and point the Launcher at the copies:
mkdir -p ~/.ad4m/tls
sudo cp /etc/letsencrypt/live/ad4m.example.com/fullchain.pem ~/.ad4m/tls/
sudo cp /etc/letsencrypt/live/ad4m.example.com/privkey.pem ~/.ad4m/tls/
sudo chown "$USER":"$USER" ~/.ad4m/tls/*.pem
chmod 600 ~/.ad4m/tls/*.pem
Then in the Launcher TLS settings, select
~/.ad4m/tls/fullchain.pemas the certificate and~/.ad4m/tls/privkey.pemas the private key.
Certificate Renewal Hook
Let's Encrypt certificates expire every 90 days. Certbot renews them automatically
(via a systemd timer or cron job), but because you've copied the files to ~/.ad4m/tls/,
the renewed certificates won't be picked up unless you copy them again.
Create a deploy hook that runs automatically after each renewal:
sudo tee /etc/letsencrypt/renewal-hooks/deploy/ad4m-copy-tls.sh > /dev/null << 'EOF'
#!/bin/bash
# Copy renewed certs to the AD4M TLS directory
DOMAIN="ad4m.example.com"
AD4M_USER="your-username"  # ← change this to your Linux username
DEST="/home/${AD4M_USER}/.ad4m/tls"

cp "/etc/letsencrypt/live/${DOMAIN}/fullchain.pem" "${DEST}/fullchain.pem"
cp "/etc/letsencrypt/live/${DOMAIN}/privkey.pem" "${DEST}/privkey.pem"
chown "${AD4M_USER}":"${AD4M_USER}" "${DEST}"/*.pem
chmod 600 "${DEST}"/*.pem

# Optional: restart AD4M executor to pick up the new cert
# systemctl --user -M "${AD4M_USER}@" restart ad4m-executor
EOF

sudo chmod +x /etc/letsencrypt/renewal-hooks/deploy/ad4m-copy-tls.sh
Test that renewal works end-to-end:
sudo certbot renew --dry-runFirewall & Port Forwarding
Firewall (UFW)
If you're running UFW on the host, open the TLS port (default 12001 — adjust if you
configured a different port in the Launcher):
sudo ufw allow 12001/tcp
sudo ufw status
Router / NAT Port Forwarding
If the host is behind a NAT (home router), add a port forwarding rule on your router:
- External port:
12001 - Internal IP: the local IP of your host machine (e.g.
192.168.1.100) - Internal port:
12001 - Protocol: TCP
The exact steps vary by router — check your router's admin interface (usually at
192.168.1.1 or 192.168.0.1).
Verifying the Setup
Test TLS connectivity from outside your network (e.g. a VPS, a friend's machine, or your phone on mobile data):
openssl s_client -connect ad4m.example.com:12001 -servername ad4m.example.comYou should see your certificate details and Verify return code: 0 (ok).
You can also use an online port checker like yougetsignal.com (opens in a new tab) to verify that the port is reachable.
NAT loopback warning: If you test from a machine on the same LAN as the host using the public domain name, the connection will likely fail with "connection refused" or time out — even when external access works perfectly. This is because most consumer routers do not support NAT loopback (also called NAT hairpinning or NAT reflection).
This is a common source of false negatives during testing. Always verify from outside your network. If you need to test locally, connect directly to the host's LAN IP instead of the public domain.
Paid Hosting via wHOT
AD4M supports paid hosting where users compensate the host in wHOT tokens for compute resources (AI inference, link storage, etc.). This is configured in the Launcher under the "Paid Hosting via wHOT" section.
How It Works
- wHOT tokens: Users pay the host in wHOT for the resources they consume. Earnings accrue to the host and can be tracked in the Launcher.
- Membrane proof: A credential issued by a hosting index that activates the Unyt Holochain DNA on the host's executor. Without this proof, the paid hosting DNA cannot join its network.
- Hosting index: A central registry (e.g.
hosting.ad4m.dev) that lists available hosts so users can discover them.
Registration Flow
- Ensure your executor is reachable over TLS — the registration process requires submitting your public URL, and the index will verify connectivity.
- Enable "Paid Hosting via wHOT" in the Launcher settings.
- Register with the hosting index — the Launcher will guide you through submitting your host details (URL, available resources, pricing) to the index.
- Membrane proof is fetched automatically — once registered, the hosting index issues a membrane proof and the Launcher installs the Unyt DNA automatically.
- Configure AI models — if you plan to offer AI inference, configure the available models in the executor settings before saving your hosting profile.
Prerequisites: TLS must be fully working and the executor publicly reachable before you begin index registration. The index will attempt to connect to your URL as part of the verification process.
3. Configure Email Verification (Recommended)
If the host configures an email service via SMTP send settings (also in the Launcher settings), AD4M will use email-based verification for sign-up and login:
- A new user registers with their email address
- AD4M sends a verification code to that email
- The user enters the code to complete registration or login
This provides a secure, familiar authentication flow. If no SMTP service is configured, AD4M falls back to simple email + password authentication without email verification.
User Registration & Authentication
Sign-Up Flow
New users register through ad4m-connect, which presents the appropriate UI automatically:
// Behind the scenes, ad4m-connect calls:
await ad4m.agent.createUser("[email protected]", "securepassword");
Each new user receives their own Decentralized Identifier (DID), giving them a cryptographic identity independent of the host.
Login Flow
Returning users authenticate with their credentials:
await ad4m.agent.loginUser("[email protected]", "securepassword");When email verification is enabled (SMTP configured), the login flow includes a verification step:
// Describe the app requesting access
const appInfo = {
  appName: "My App",
  appDesc: "An example AD4M application",
  appDomain: "myapp.example.com",
};

// Request login—triggers verification email
const result = await ad4m.agent.requestLoginVerification(
  "[email protected]",
  appInfo,
);
// result.isExistingUser, result.requiresPassword, etc.

// User enters the code from their email
const jwt = await ad4m.agent.verifyEmailCode(
  "[email protected]",
  "123456",
  "login",
);
The returned JWT token is scoped to that specific user and used for all subsequent API calls.
Data Isolation
Each user's data is fully isolated within the shared executor:
- Perspectives are user-scoped: A user can only see and modify their own perspectives. Attempting to access another user's perspective is denied.
- Capability tokens are user-specific: Each JWT contains the user's DID, ensuring all operations are scoped to the correct identity.
- Neighbourhoods work as usual: Users can still create, publish, and join Neighbourhoods for collaboration—the multi-user boundary is about local data, not shared spaces.
For App Developers: No Changes Required
If you're building an AD4M app, multi-user mode is transparent to you. The ad4m-connect library handles the entire connection flow—whether the user is running a local executor or connecting to a remote multi-user host:
import Ad4mConnect from "@coasys/ad4m-connect";

const ui = Ad4mConnect({
  appInfo: {
    name: "My App",
    description: "Works the same on local or hosted AD4M",
    url: "myapp.example.com",
  },
  capabilities: [
    {
      with: { domain: "*", pointers: ["*"] },
      can: ["*"],
    },
  ],
});

ui.connect().then((client) => {
  // This client works identically whether connected to
  // a local single-user node or a remote multi-user host
});
When connecting to a remote multi-user host, ad4m-connect automatically presents the sign-up/login flow instead of the local capability handshake.
Connecting to a Remote Host
To allow users to connect to a remote multi-user host, enable the hosting option. You
can also set remoteUrl to pre-fill the host URL for convenience:
import Ad4mConnect from "@coasys/ad4m-connect";

const ui = Ad4mConnect({
  appInfo: {
    name: "My App",
    description: "A collaborative app powered by AD4M",
    url: "myapp.example.com",
  },
  capabilities: [{ with: { domain: "*", pointers: ["*"] }, can: ["*"] }],
  // Show the "Remote Node" option alongside "Local Node"
  hosting: true,
  // Pre-fill the manual URL input on the host browser screen
  remoteUrl: "wss://ad4m-hosting.example.com:12001/graphql",
});

ui.connect().then((client) => {
  // The user will be prompted to sign up or log in
  // before this resolves
});| Option | Type | Description |
|---|---|---|
hosting | boolean | Shows a "Remote Node" option on the connection screen alongside the default "Local Node" option |
remoteUrl | string | Pre-fills the manual URL input on the host browser screen (e.g. wss://host:12001/graphql). The user still needs to click "Connect" to proceed |
User-Facing Flow
When hosting: true is set, the user sees the following screens:
-
Connection Options — the user chooses between Local Node (connect to a local executor) and Remote Node (connect to a hosted executor). The "Remote Node" option is only shown when
hosting: trueis set.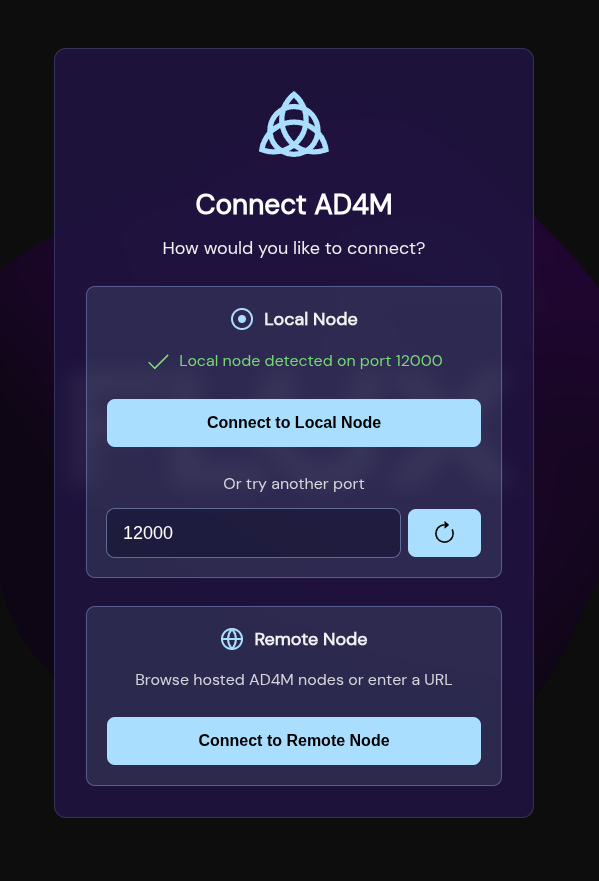
-
Host Browser — after clicking "Remote Node", the user sees a list of available hosts from the hosting index, plus a manual URL input at the bottom. If
remoteUrlwas provided, the manual input is pre-filled with that URL.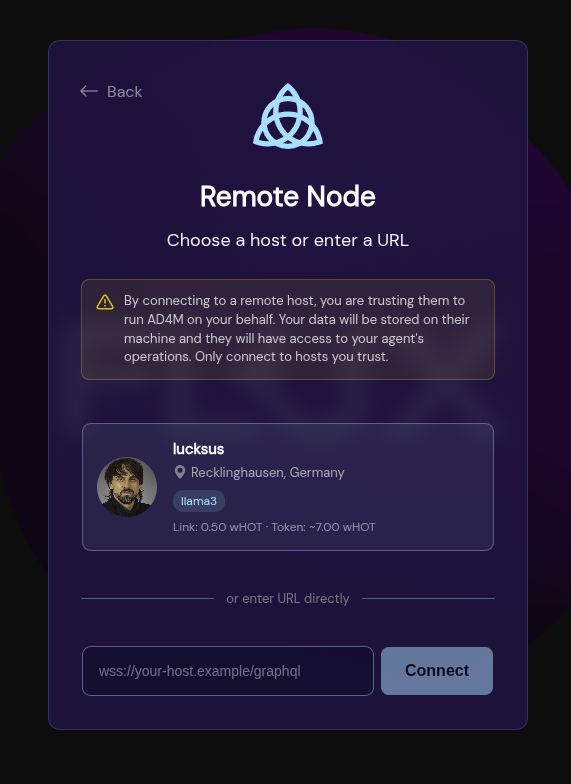
-
Host Detail — after selecting a host (or clicking "Connect" on the manual URL), the user sees host details and a trust warning.
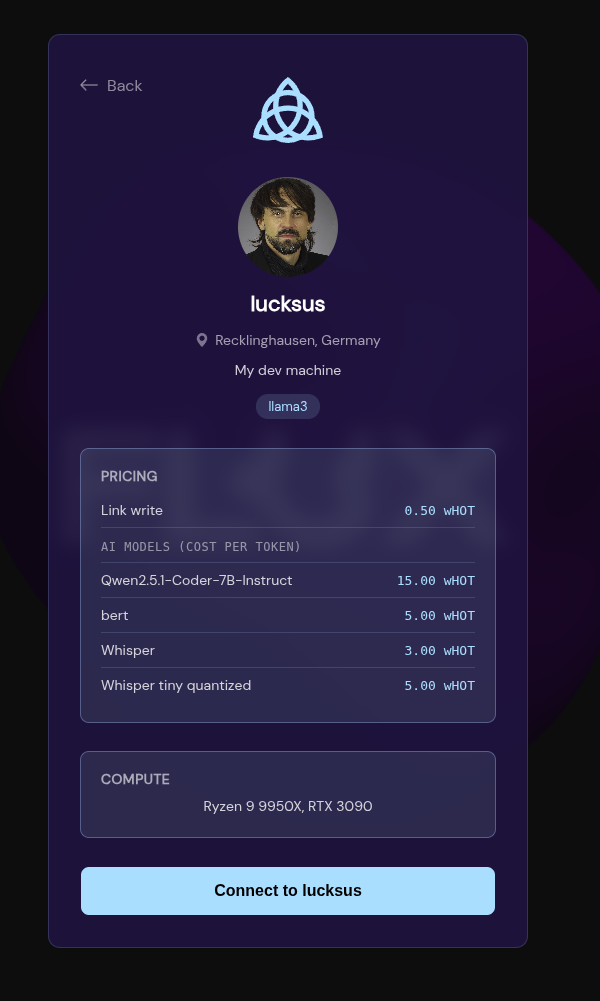
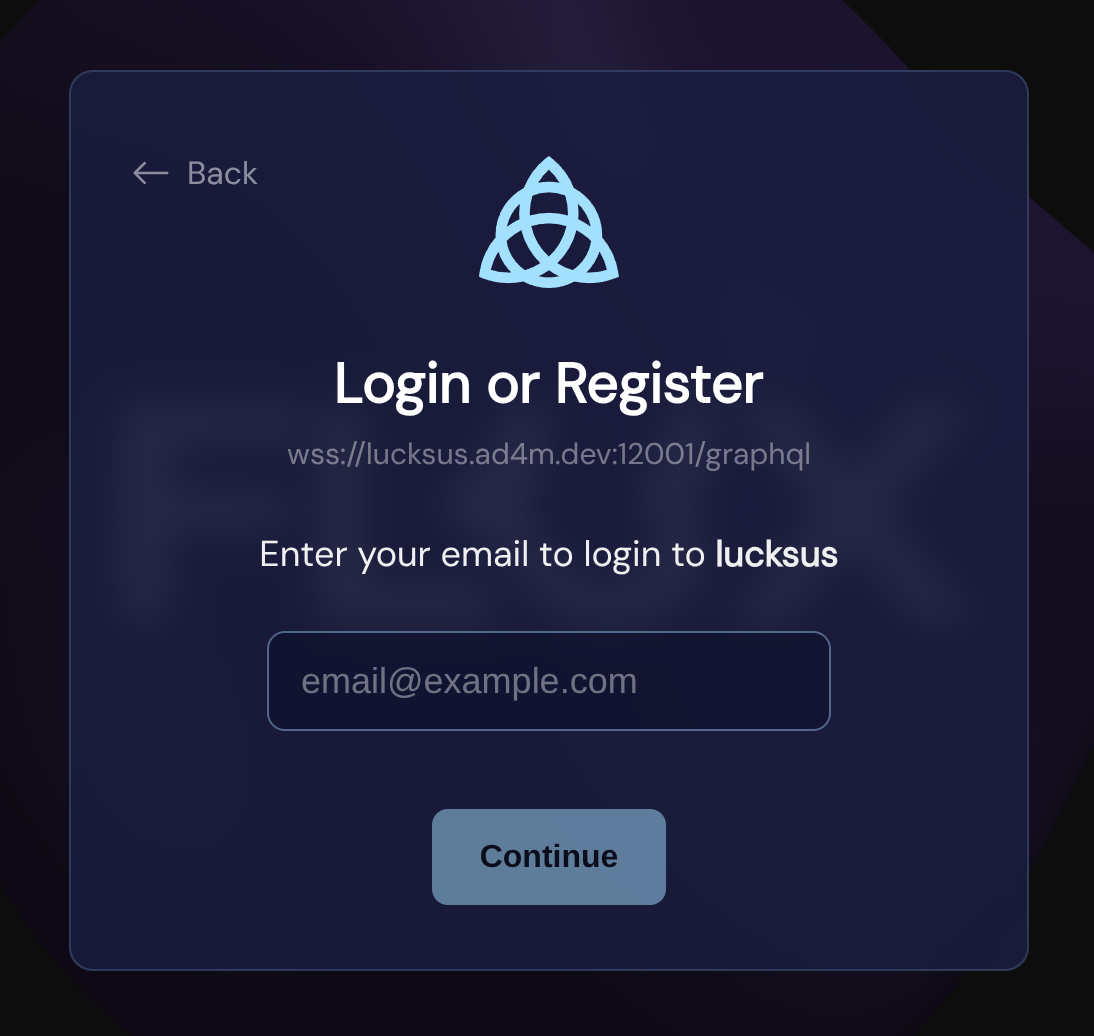
-
Remote Authentication — the user is presented with an email + password sign-up/login form. If the host has SMTP configured, email verification is included.
For end users: When you connect to a hosted AD4M node through an app, you will be asked for an email address and password to create your account. Your DID (decentralized identity) and all your data belong to you — the host provides infrastructure only. You can export your data and move to another host or your own node at any time.
Administration
The host administrator can monitor and manage users:
// List all users with statistics
const users = await ad4m.runtime.listUsers();
// Returns: [{ email, did, lastSeen, perspectiveCount }, ...]
Admins can also manage capabilities on behalf of users:
// Request capability for a specific user
await ad4m.agent.requestCapabilityForUser(username, authInfo);

// Generate a JWT for a specific user
const jwt = await ad4m.agent.generateJwtForUser(username, requestId, rand);
Summary
| Aspect | Single-User (Default) | Multi-User |
|---|---|---|
| Who runs the node | Each user | A host, for many users |
| Identity | Own DID | Own DID (unchanged) |
| Data isolation | Only one user | Per-user scoping |
| App compatibility | Standard | Fully compatible, no changes |
| Connection | localhost:12000 | Remote URL with TLS |
| Authentication | Capability handshake | Email + password (optionally with email verification) |
| Configuration | AD4M Launcher | AD4M Launcher Settings |